Growing Potatoes
How to grow potatoes
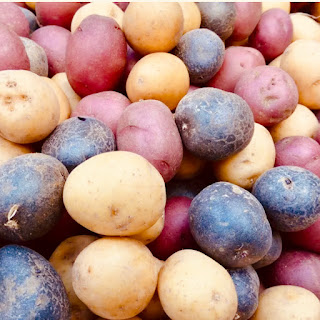
Introduction: On a trip to Peru a few years ago, we were stunned to see the hundreds of varieties of potatoes - all shapes, sizes and colours.
The humble potato was domesticated in the South American Andes some 8,000 years ago and was only brought to Europe in the mid-1500s. This seemingly innocuous action would shape world events like nothing before. According to historian William H. McNeill, "Potatoes, by feeding rapidly growing populations, permitted a handful of European nations [to seek new lands forcing them] to assert dominion over most of the world between 1750 and 1950."
Unfortunately without proper crop rotation, the entire crop can fail. As the world realised very tragically when between 1845-52 Ireland suffered a period of starvation, disease and emigration that became known as the Great Potato Famine of Ireland where an estimated 1,000,000 people died. This, along with emigration to escape the famine, significantly reduced the population of Ireland.
The humble potato has since become a crucial part of the staple diet of people all over the world, earning the moniker of the “world's most successful immigrant”. The potato is the world’s fourth-most important crop after rice, wheat and maize, and the first among non-grains.
Let's see how to grow potatoes in the garden.
Potato varieties
Determinate potatoes typically produce an entire crop at once, therefore, do not benefit from hilling as do indeterminate potatoes
- Round white potatoes (indeterminate e.g. Atlantic, Superior, Kennebec, Elba): have buff-coloured skin with white flesh with a waxy, slightly creamy texture and a low sugar content. Best for frying, mashing, salads, steaming and boiling
- Russet potatoes (indeterminate e.g. Gold Rush, Burbank, Pioneer): These potatoes have a thick skin that’s light to medium brown. The interior is white to yellow with a fluffy texture when cooked. Best for baking, mashing and roasting
- Red potatoes (indeterminate e.g.Norland Red, Strawberry Paw, Adirondack Red, Chieftain, La Rouge)A thin red skin and white interior characterize this group. The firm texture holds up well to cooking. Best for soups, salads, roasting and mashing.
- Yellow potatoes (determinate e.g. Yukon Gold, Natascha, Yellow Finn) Thin light tan to golden skin with a yellow interior. It's a waxy potato with a creamy, slightly buttery flavor. Best for grilling, roasting, mashing and salads
- Purple and Blue Potatoes (indeterminate e.g. All Blue, Purple Peruvian, Elmer's Blue, Magic Molly, Purple Majesty) Some have blue or purple skin and flesh, others have colourful skin with a white interior. Blues and purples have a slightly earthy taste and hold on to the pretty colour when they’re cooked. Best for roasting, grilling or salads.
- Fingerling (determinate eg. Cowhorn, Nosebag, Russian Banana, Red Thumb). There are a variety of colors with fingerlings, but they’re all oblong in shape with a waxy firm texture and a buttery or earthy taste. Best for Frying, roasting or salads
How to grow potatoes in the garden
Step 1: When to start chitting potatoes: Chitting potatoes, also called greensprouting, or pre-sprouting, is a way of preparing potatoes for planting by encouraging them to sprout before planting in the ground. This gives the tubers a head start and encourages faster growth and heavier crops once the seed potatoes are planted.
Determine the best Potato planting time for your climate zone: Typically you can start planting your potatoes in the ground in early spring about two to four weeks before your last expected frost date. The warmer the temperature the better, as they will not do well in cold, wet soil.
Step 2: Six to eight weeks before this, typically sometime in January for the San Francisco Bay Area, start storing the potatoes in a dark warm area around 21C/70F to break them out of dormancy and kickstart the growth from the eyes of the potato. I prefer organic potatoes from the Farmer's Market because grocery store potatoes might have been treated with a sprout-retardant to extend their shelf life - this renders them unsuitable for planting
Step 3: Once you see growth from the potato eye, cut off the budding areas using a sharp, clean knife into smaller pieces. Each piece should be approximately 2 inches square and must contain at least 1 or 2 eyes or buds. Cutting your seed potatoes is a thrifty way of increasing your seed stock and potential yield. Each piece will grow a potato plant that will produce numerous tubers. Let the cut areas heal over for a few days at 70F before planting. The cut will become calloused and the rest should feel leathery and dry. You can also dip the freshly cut ends in wood ash.
Step 4: Move it to a brighter spot with indirect sunlight and cooler temperatures around 10C/50F to encourage green growth. A porch or windowsill would also be a good location.
Step 5: Cull all but the most vigorous shoots. Remove shoots except large ones (optional) taking care to carefully rub off the unwanted shoots. Leave 3 or 4 of the largest, strongest shoots. Once the sprouts have grown to 3-5cm / 1-2 inches long, it's time to put them in the ground. The longer you can give your potatoes to grow, the higher the yields will be. Potatoes were first discovered growing in the dung of llamas in S America - this should tell you that they have evolved to grow in heaps of horse manure or cow dung. Plant the sprouted potatoes two to four weeks before your last expected frost date, once the soil has drained, and the soil temperature is at least 45˚F. If you have to postpone planting because of the weather, move the seed potatoes to a cooler location to slow down the growth of the sprouts.
Step 6: Sun and Soil requirements: Potatoes always do best in full sun. They are aggressively rooting plants, and we find that they will produce the best crop when planted in light, loose, well-drained (not soggy) soil that is slightly acidic (5.8-6.5 pH). Add high phosphorus fertilizer like fish emulsion or composted manure for best results. Plant them in trenches, with the cut-side down (eyes up) at least 12cm deep and 30cm apart, with 60cm between rows. Sprinkle 2 tablespoons of a low-nitrogen, high-phosphorous fertilizer in the gaps and cover lightly with soil. For the San Francisco Bay Area this means planting around end Feb to mid-March. Gradually harden the seedlings to match the temperature to that of the soil, to prevent seed potatoes from undue shock. March. Note: Even though many people choose to plant sprouted potatoes in containers, and they do well in large pots and in grow bags, I am not covering this here.
Step 7: Hilling or Earthing up for indeterminate potatoes: Once the indeterminate potato foliage grows to roughly 10cm high, you need to start ‘earthing up’ the green stem or stolon by drawing soil around the leaves. Cover all but the top leaves. This stops surface tubers from going green and turning poisonous, helps guard against blight, improves drainage and controls weeds. Keep hilling until the plant starts to flower or the foliage is too high (above 18 inches from the ground) to cover. Mulch with rotting hay or garden waste but also watch for slugs.
Step 9: How to Water Potatoes: Keep your potato vines well watered throughout the summer, especially during the period when the plants are flowering and immediately following the flowering stage. During this flowering period the plants are creating their tubers and a steady water supply is crucial to good crop outcome. When the foliage turns yellow and begins to die back, discontinue watering. This will help start curing the potatoes for harvest time.
Step 10: When to harvest potatoes: Wait a couple of weeks after the first flower opens, or you’ll be eating potatoes the size of your thumbnail. Yellowing foliage shows your first and second earlies are ready. With maincrops, wait until the foliage begins to die
Step 11: How to harvest potatoes without damaging them: I harvest by hand, starting with the biggest potatoes that are nearest the stem. Once you harvest those the next in line will start growing faster. If you do have to harvest all at once, say at the end of the season then a pitchfork is better than a spade, as there is less risk of slicing right through a potato. Some gardeners prefer to leave the tubers in the ground for roughly two weeks to let the skin ‘set’ or they won’t store well. You can take them straight from the garden into the kitchen without storing them.
Step 12: How to store potatoes without damaging them: I leave them in the ground until the cool/wet weather arrives. Long-term storage should be cool but frost-free, around 4 °C. Store them in the dark or they will turn green and poisonous.
Step 13: To save your own seed potatoes: Select some good quality, healthy and whole tubers from your harvest. Brush off the soil, but do not wash them. Put potatoes in the light briefly to let them green a little. (This encourages dormancy.) Place the potatoes in a cool, dry, dark place, kept at a constant temperature of around 50 degrees Fahrenheit. Make sure there is good airflow around your seed potatoes. The following year, take these tubers from storage and place them in a cool, bright place to chit. And start the process all over again.
Potato Diseases and Pests
Blighted potatoes
1. What is potato blight and how to avoid it?
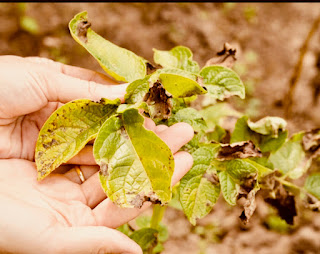
Potato blight is a disease that can devastate crops. Caused by the fungus Phytophthora infestans, the spores are spread easily through the air from one plant to the next, even over a distance. They can lie dormant until the right conditions occur - most commonly in July and August after a period of damp, humid weather. Brown spots on the leaves are a sure sign of this fungal disease. If more than a third are infected, cut down all the foliage, bag it and bin it. Do not put it on your compost. To reduce the chance of infection, only plant potatoes (or tomatoes and other members of the nightshade family, such as eggplants or chilli peppers) in the same patch of land after leaving at least two years of no nightshade in that same area. Some Gardners get around it by heavily amending the soil with new soil that is free of contagions. Also, promptly remove any volunteer potatoes that emerge in your garden. The disease overwinters in tubers left behind during the previous year’s harvest.
2. What about potato pests?
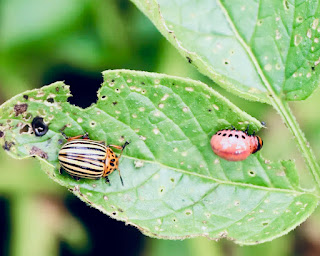
Colorado Potato Beetle can quickly defoliate potato plants and they’ll decimate a harvest. The young beetle larvae are soft-bodied and a red/brown colour, with a line of black dots down their sides. Once mature, they have yellow and black striped bodies and orange heads. The best treatment is gently picking them off by hand, one by one. They’re about the size of a dime, so it’s not like they’re hard to spot.
References
- Adamant, A. (2022, June 29). Planting sprouted potatoes. Practical Self Reliance. Retrieved February 2, 2024, from https://practicalselfreliance.com/planting-sprouted-potatoes/
- Fowler, A. (2023, December 23). Is your potato sprouting? Don’t chuck it: You could get a crop out of it next year. Retrieved February 2, 2024, from https://www.gardensillustrated.com/plants/chitting-potatoes-how-to
- Rachel. (2023, December 3). Chitting potatoes gives them a head start. Grow a Good Life. Retrieved February 2, 2024, from https://growagoodlife.com/chitting-potatoes/
- Waddington, E. (2020, March 2). How to chit seed potatoes + planting + growing tips. Rural Sprout. Retrieved February 2, 2024, from https://www.ruralsprout.com/chit-seed-potatoes/
- Jacobs, K. L. (2023, May 10). Growing potatoes: How to plant & harvest potatoes. GardenDesign.com. Retrieved February 2, 2024, from https://www.gardendesign.com/vegetables/potatoes.html
- McNeill, W. (1999). How the Potato Changed the World’s History. www.jstor.org, 66(1), 67–83. https://www.jstor.org/stable/40971302?seq=1


Comments
Post a Comment
Please keep conversations courteous and on-topic. Kindly don’t engage in trolling, flame-baiting, name-calling, insulting, stereotyping or gratuitous attacks. Thank you for being a good citizen.